Home Art Fun Series
EVAN HUTCHINSON
THE BOOK
my friend earth
By patricia maclachlanOur friend Earth does so many wonderful things! She tends to animals large and small. She pours down summer rain and autumn leaves. She sprinkles whisper-white snow and protects the tiny seeds waiting for spring.
Readers of all ages will pore over the pages of this spectacular book. Its enticing die-cut pages encourage exploration as its poetic text celebrates everything Earth does for us, all the while reminding us to be a good friend in return. Patricia MacLachlan is an acclaimed author who has written dozens of books-from picture books to novels-including the Newbery Medal winner Sarah, Plain and Tall .
SHOP LOCAL (SHIPPING AVAILABLE):
INDIGO
A DIFFERENT BOOKLIST
WHAT YOU'LL NEED
- Multi-coloured construction paper
- 4-6 sheets of card stock (recommended 8.5”x11”)
- Exactor knife
- 1 paper plate
- PVA glue
- String or wire
- Scissors
- Pencil
- Eraser
- Ruler
- Assorted paints (in this lesson, acrylic paints are used, but not limited to)
- Paint brush
- Straw
- Clear tape
- Single hole puncher (optional)
- Cutting matt (optional)
- Hot glue gun (optional)
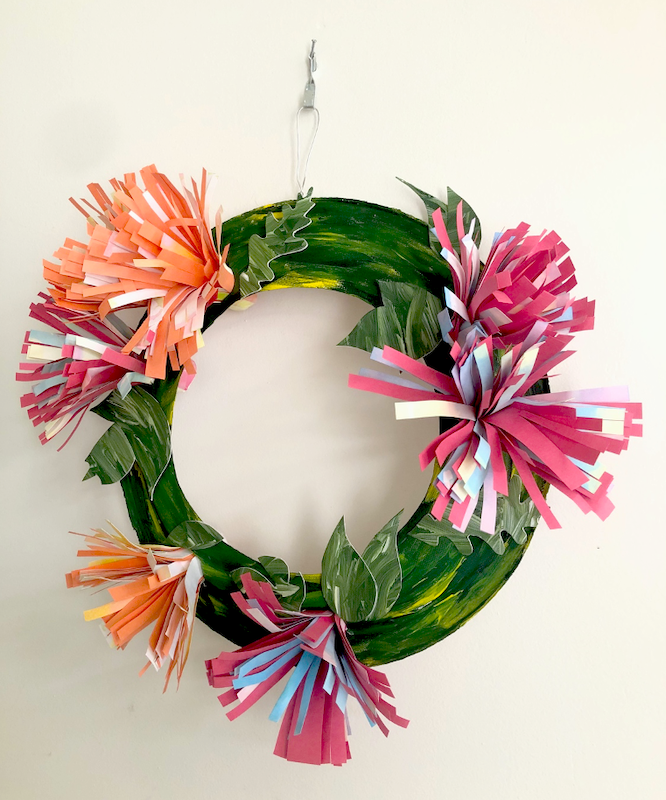
WHAT to do
1. Begin by choosing 2-6 assorted colours of paint on hand. In this lesson, pink, yellow and blue, red and green acrylics are included but not limited to.
2. In a jar, mix 1/2 cup of water and 1 teaspoon of paint. Mix thoroughly. Do this for each paint in separate jars.
3. Place 1 piece of cardstock paper in front of you. Choose 2-3 colours you are going to begin with for each sheet of paper. Take a teaspoon and pour a bit of paint onto the paper. With adult supervision, place the straw to your mouth and blow air at the paint on the paper to give a more splattered and tie-dye effect. Continue to do this on the same piece of paper until the paper is mostly or entirely covered with paint. Set aside to dry and repeat for the remaining pieces of paper. Note: This can get a little messy. It is advised to have a cloth on the surface you are working on.
4. Please have your adult assist you with this step. Take the paper plate and lay it flat on a surface. With a pencil, stencil a circle to use as a guideline for cutting.
If you have a cutting mat, place the mat underneath your plate before cutting. Very carefully begin to cut away the centre of the plate with the exactor knife and hold onto the plate steadily with your opposite hand. Once the centre is cut out, set it aside and do not throw it away.
5. It’s time to paint your wreath! With assorted paint colours, begin to paint your entire wreath. Optional: you can also use oil pastels instead of paint.
6. The cut-out circle from the plate is going to be used as leaf cut-outs for your wreath. Go ahead and paint or use oil pastels to colour the cut-out circle.
7. Collect your now dried and colourful paint splattered pieces of cardstock. With a ruler, draw and cut out vertical strips that are between 2-3 inches in width. Play around by using slightly different widths – they don’t all have to be the same! Repeat this step with the same amount of coloured construction paper sheets. Each pair of strips will be a flower for your wreath! Make however many flowers you want to decorate your wreath with. *Note: If you do not have coloured construction paper, go ahead and paint the opposite side of your splattered paint sheets a solid bright colour. Allow sheets to dry before proceeding to next step.
8. Take one strip of coloured construction paper and one strip of your painted sheets. Place one on top of the other. With scissors, begin to cut various widths and lengths of strips. Make sure you don’t cut all the way to the bottom! Leave about a ½ inch of space that isn’t cut into.
9. Line up both strips that have been cut into and begin to roll. Be careful not to rip the paper in this process. Aim to have the bottom of your rolled-up paper to the diameter of a dime to a quarter in size.
Like seen above, rotate between rolling the paint splattered sheet inside the construction paper and also outside of the construction paper!
10. Use clear tape to secure the rolled paper.
11. Fan out the top of the flower with your fingers gently.
12. Once you have all your flowers created, decide on the placement of the flowers on your wreath! With your pencil, draw an ‘x’ where you want each flower. Give a minimum of ½ inch between each flower.
13. Please have your adult assist you with this step. With the exactor knife, cut into the drawn x’s. Gently push into the incision with your finger and bend the ‘x’ back to allow the flowers to slide in easier. 14.Slide the flowers into each x. Optional: Secure each flower by using hot glue around the perimeter of the flower.
15. Grab your dried painted centre of the plate. With a pencil, begin to draw on the back side various sizes and shapes of leaves. Cut them out with scissors.
16. With PVA glue or hot glue, adhere leaves to the wreath. If you are using hot glue, please have an adult assist you. 17. Please have your adult assist you with this step. If you have a single hole puncher, punch a hole at the top of the wreath. Otherwise, cut a small hole with exactor knife. 18. Use either string or thin metal wire to feed through the hole and create a loop to hang the wreath.